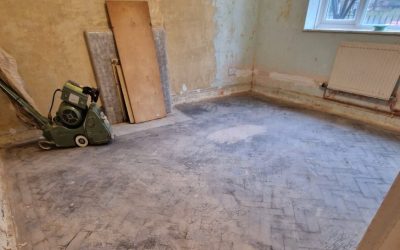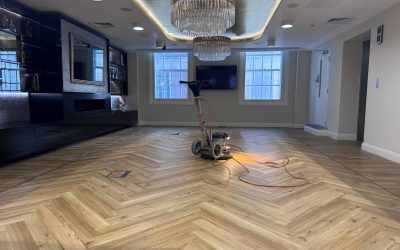

Transform Your Bicester Home with Professional Expertise
There is something undeniably welcoming about the glow of seasoned oak boards or the gentle figuring of Victorian pine. Yet many floors in Bicester’s characterful terraces, new-build family homes and barn conversions have lost their sparkle after decades of footfall, furniture scrapes and DIY disasters. Thankfully, Wood Floor Sanding offers a proven route from tired to tremendous, revealing grain that rivals the day the planks were laid.
In this comprehensive guide we unpack every stage of the journey—explaining the science behind the sanding drum, identifying the right finishes for Oxfordshire’s climate, and detailing the care routine that will keep your boards beautiful for decades. Whether you are a first-time buyer renovating a 1950s semi on Kings End, or a long-time resident restoring a listed cottage in Bucknell, the information that follows will help you plan with confidence.

The Benefits of Sanding: More Than Just Looks
Professionally refreshed boards do far more than please the eye. When Wood Floor Sanding removes ingrained dirt and micro-gouges it also eliminates places where dust mites and allergens collect, making indoor environments healthier for children and pets.
Other advantages include:
- Increased property value – Estate agents regularly note that original timber, restored to its prime, can lift sale prices by 2–5 %.
- Improved light reflection – Pale, polished timber bounces natural light deeper into rooms, reducing reliance on artificial lighting.
- Longevity – Modern lacquers resist spills and scratches, extending maintenance cycles by up to a decade.

Step One: Assessing the Floor
Before a single abrasive strip is fitted, homeowners should establish three essentials:
- Species and age – Pine, oak and maple react differently to sanding heat and to stains. Older floors may have thinner wear layers.
- Condition – Look for loose boards, protruding nails, damaged tongues or signs of historical damp.
- Historical restrictions – Many cottages around Bicester’s Conservation Areas require sympathetic methods approved by the local council.
Armed with this knowledge you—or your chosen contractor—can calculate the depth of cut needed and decide whether localised repairs precede the main event.

Preparing the Space
Great results begin with a clear, stable environment. Move furniture into a neighbouring room or hire short-term storage; empty bookcases and sideboards weigh less and are easier to manoeuvre. Curtains should be removed and light fittings covered. Although modern vacuum-assisted machines capture up to 98 % of dust, a little inevitably escapes, so seal adjoining doorways with painter’s tape and plastic sheeting.
Take time, too, to select your finish in advance. Oil, hard-wax oil, water-based lacquer and penetrating stain each alter colour and sheen in unique ways. Request test patches on an off-cut or hidden corner so you can see how Bicester’s natural daylight affects the tone throughout the day. During this stage your contractor will likely schedule the machinery drop-off, confirm power requirements and brief neighbours about potential daytime noise.

The Sanding Process Explained
Industrial machinery may look intimidating, yet its workflow is wonderfully logical. A typical three-bedroom home follows these stages:
- Coarse cut (24–36 grit) – Removes old varnish, paint and uneven boards.
- Medium cut (40–60 grit) – Levels the surface and begins to refine scratches.
- Fine cut (80–100 grit) – Smooths ready for finishing.
- Edge sanding and corner detail – Small orbital or triangular sanders reach areas the main drum cannot.
- Gap filling – Resin mixed with fine dust from your own floor provides an almost invisible putty.
- Final buff (120 grit mesh) – A rotary machine blends the grain for a silk-like touch.
For parquet, an additional diagonal pass combats cross-grain tear-out. Throughout, moisture and temperature are monitored because timber expands and contracts; a too-humid day can leave sanding marks that only become apparent once lacquer is down. Top-tier professionals log readings with hygrometers and delay application of finishes if conditions fall outside their ideal range.
Once the final abrasive has kissed the boards, vacuum and wipe with an isopropyl alcohol tack cloth. At this immaculate point, the floor is a blank canvas—free of dust yet still porous enough to welcome stain or primer.

Choosing the Right Finish for Oxfordshire Living
Bicester households juggle muddy school runs, cyclists wheeling bikes through hallways and the occasional spilled Aperol Spritz during summer barbecues. Finishes must therefore blend beauty with brawn:
- Water-based lacquer – Fast drying, nearly odourless and available in matt, satin or gloss. Two-component varieties rival commercial durability.
- Hard-wax oil – Derived from natural plant oils and waxes that penetrate and harden within the grain, leaving a soft sheen. Spot repairs are straightforward.
- Traditional oil – Deeply enriches colour, especially on oak, but requires periodic re-oil.
- Stain plus lacquer combo – Lets you shift a pale pine towards a smoked-oak aesthetic while still sealing with a tough topcoat.
Ask suppliers for products tested to BS EN 71-3 (Toy Safety) and ISO 16000-9 (low VOC) standards. These certifications ensure minimal off-gassing—important when rooms will be re-occupied within 24 hours.

Aftercare: Protecting Your Investment
A newly finished floor rewards a few simple habits:
- Place coir or rubber mats at every external door; 80 % of grit arrives on footwear.
- Stick felt pads under chairs and table legs. Replace annually.
- Opt for vacuum cleaners with a soft-bristle parquet head rather than a revolving beater bar.
- Every week, damp-mop with a pH-neutral cleaner. Avoid steam.
- In kitchens, wipe spills promptly to prevent tannin bleed or water marks.
When traffic lanes eventually dull—typically after 5–7 years— a light screen-and-recoat adds fresh lacquer without repeating the full sanding cycle. Homeowners who adopted this maintenance programme in Bicester’s Southwold estate report pristine finishes a decade on.

Budgeting: What Will It Cost?
Prices fluctuate with square meterage, board condition and chosen finish, but these ballpark figures help financial planning:
| Project element | Typical cost (inc. VAT) |
|---|---|
| Floor survey & moisture testing | £50–£80 |
| Full reclaim-grade sanding (pine boards) | £22–£28 /m² |
| Gap filling with resin | £4–£6 /m² |
| Three-coat water-based lacquer | £10–£14 /m² |
| Hard-wax oil (two coats) | £12–£16 /m² |
| Furniture moving & storage | £150–£300 per room |
Many companies offer package rates, so gather at least three written quotations. Check that each contractor carries public liability insurance up to £5 million and belongs to a trade body such as the Federation of Master Builders or the National Institute of Carpet and Floorlayers. Online review platforms can be helpful, but nothing beats visiting a finished project to see workmanship first-hand.
Why Hire Local?
Engaging a Bicester-based specialist brings practical and environmental advantages:
- Rapid site visits – Should a knot bleed or plank cup unexpectedly, help is minutes not hours away.
- Knowledge of local sub-floors – From the suspended timber joists of Langford Village to the concrete slabs in Elmsbrook’s eco-homes, local firms understand the quirks.
- Lower mileage – Fewer van journeys mean reduced carbon footprint and, often, keener pricing.
During your vetting process, request a detailed schedule. A standard lounge can be completed in two days, but whole-house projects may run to a week, excluding curing time.
When DIY Makes Sense—and When It Doesn’t
Tool-hire shops on Launton Road rent drum sanders for around £60 per day. DIY can be rewarding if you are tackling a small bedroom with uncomplicated edges, have a full day spare and are happy to accept a few character marks. However, rental machines weigh 40 kg and vibrate aggressively; without experience it is easy to create “chatter” waves or gouge stationary troughs.
Remember too that in DIY scenarios you must purchase abrasives separately, manage dust extraction, return heavy equipment on time and dispose of used solvent responsibly. For large, valuable, or listed spaces the cost of correcting errors often exceeds the original saving. It is no surprise that many capable DIYers still choose professional Wood Floor Sanding once they price materials, lost weekends and the added stress.
Frequently Asked Questions
How often can a floor be sanded?
Solid boards can tolerate multiple full cuts; typical pine loses 1 mm per sanding and starts at 19 mm thick. Engineered planks offer 3–6 mm of veneer, equating to two or three gentle resurfacings.
Is dust-free really dust-free?
No system is 100 %, but HEPA-filtered extraction on modern machines captures fine particles extremely efficiently. Expect a light wipe-down rather than clouds.
Can I stay in the house during work?
Yes, though you will need to avoid treated rooms. Many families choose to holiday locally—Bicester Hotel & Spa’s pool proves a welcome refuge while coatings cure.
Will sanding remove deep black stains?
If damage has penetrated beyond 2 mm, complete removal may not be possible. Oxalic acid treatments can fade iron marks, or a darker stain can camouflage residual discolouration.
Sustainability: Caring for the Planet as Well as the Floor
Timber already scores highly because it locks carbon for the lifetime of the boards. Extending that lifespan through professional Wood Floor Sanding is inherently sustainable. Enhance green credentials further by:
- Choosing UK-made finishes to reduce shipping miles.
- Selecting low-VOC products.
- Retaining original floorboards instead of installing new laminate.
Local contractors often collaborate with recycling schemes, ensuring sawdust becomes bio-fuel briquettes rather than landfill.
A Timeline for Success
| Day | Activity | Notes |
|---|---|---|
| 0 | Book survey | Confirm species, moisture, repairs |
| 1 | Clear rooms, acclimatise finish | Temperature ideally 18–22 °C |
| 2 | Coarse & medium cuts | High noise levels 08:00–17:00 |
| 3 | Fine cut, edges, filler | Overnight cure for resin |
| 4 | Buff & first coat | Allow 2 hours touch-dry |
| 5 | Second coat | Light denib between layers |
| 6 | Final coat | Foot traffic after 24 h |
| 7 | Replace furniture | Use felt pads, lift not drag |
Adjustments may be necessary for humidity or complex layouts.
Common Mistakes to Avoid
Even with the best intentions, homeowners sometimes make choices that compromise a floor’s potential. The most frequent pitfalls include:
- Skipping the survey – Beginning work without moisture readings can trap residual damp beneath a finish, leading to peeling or white bloom within months.
- Using the wrong grit sequence – Jumping directly from coarse to fine paper leaves deep swirl patterns that re-emerge when sunlight rakes across the grain.
- Over-sanding edges – Keeping an edger stationary for a second too long hollows the board perimeter, making shadows once lacquer dries.
- Applying thick coats – More finish does not equal more protection; instead it pools, wrinkles and extends curing times.
- Ignoring curing guidelines – Dragging sofas back after twelve hours may scar even the toughest lacquer.
Avoiding these errors saves both money and disappointment. A trained technician will spot and prevent them, but if you are DIY-inclined, keep a printed checklist in the room and tick off each stage before moving on.
Case Study: From Drab Dining Room to Show-Stopping Centrepiece
Charlotte and Sam own a 1930s semi off Banbury Road. Their dining room floor had been smothered under laminate since the late nineties. During renovation they discovered 20 mm pine boards complete with original cut-nails and ink stamps from an Oxfordshire timber yard. The couple wanted a natural, Scandi-inspired look that would withstand toddler toys and occasional red-wine spills.
After an on-site consultation the contractor proposed:
- Repairs – Replace three split planks, re-seat loose tongues and re-drive protruding nails.
- Dust-free sanding – A four-stage sequence finishing at 120 grit.
- Stain – White-pigmented lye to soften the yellow hue of aged pine.
- Finish – Two coats of commercial-grade water-based lacquer in ‘Ultra-Matt’.
The project took four days, with full use of the room restored on day six. Charlotte says, “The transformation is extraordinary—friends assume we laid new timber.” Crucially, total cost, including furnishings storage, came in under £1 250, less than half the price of engineered oak. Their story underlines how local Wood Floor Sanding can be the most sustainable and economical upgrade available.

Finishing Touches
Sanding complete, you can elevate the space further:
- Rugs – Choose breathable natural fibres such as jute or wool. Avoid latex backings, which can trap condensation.
- Skirting boards – A fresh coat of white eggshell paint provides crisp contrast against honeyed timber.
- Acoustic insulation – New under-floor mineral wool reduces both airborne and impact sound, a boon in open-plan layouts.
Remember to keep relative humidity between 45 % and 60 %—small hydrometers cost less than £10 and prevent seasonal cupping or gapping.

Seasonal Considerations: Bicester’s Changing Climate
Oxfordshire experiences mild winters and pleasantly warm summers, yet recent shifts in weather patterns mean humidity swings are becoming more pronounced. Timber is hygroscopic—it absorbs moisture when the atmosphere is damp and releases it when dry. Observing a few seasonal guidelines will help your renewed boards stay flat and flawless:
- Winter heating – Central heating can drop indoor humidity to 30 %, causing gaps between boards. Counteract this with decorative humidifiers or by placing bowls of water near radiators.
- Spring showers – Increased rain brings mud. Double-up on entrance mats and encourage family members to swap outdoor shoes for slippers.
- Summer sun – Intense UV fades pigments. If you opted for an oil finish, consider a maintenance coat that includes UV blockers; alternatively, draw blinds during peak afternoon light.
- Autumn leaves – Grit blown in from pathways can act like sandpaper. A quick weekly vacuum during leaf-fall season protects the lacquer system.
Monitoring conditions is straightforward: pocket-sized hygrometers display temperature and relative humidity at a glance. Many smart-home systems even send alerts when readings stray beyond set parameters, allowing preventative action before the floor reacts visibly.
DIY Versus Professional: Crunching the Numbers
At first glance, hiring machinery appears cost-effective. Yet a true comparison includes consumables, protective equipment and opportunity cost. Here’s how a 25 m² lounge stacks up:
| Expense | DIY (£) | Professional (£) |
|---|---|---|
| Drum & edge sander hire (3 days) | 180 | – |
| Abrasive belts/discs | 95 | – |
| Dust extraction bags | 25 | – |
| Ear, eye & respiratory PPE | 40 | – |
| Finish & applicators | 120 | Incorporated |
| Waste disposal | 20 | Incorporated |
| Your time (24 h @ £15/h)* | 360 | – |
| Total | 840 | 725–850 |
*Valuing a weekend at £15 per hour reflects average take-home pay; adjust to suit your own circumstances. The table demonstrates that a skilled crew often delivers comparable or even better value once efficiency and risk are considered.

Conclusion:
From humble hallway to open-plan kitchen-diner, Bicester’s homes brim with floors worth saving. By following the guidance above—researching finishes, preparing spaces meticulously and partnering with experts where needed—you can transform splintered planks into a resilient, radiant surface that complements contemporary living.
Ready to begin? Explore what professional Wood Floor Sanding can do for your property and enjoy a floor that tells a story every time you cross the threshold.